Thursday, November 19, 2015

Votive DIY Makeover

Another Votive Make Over

I know that there is a million and a half votive makeovers online. Well...here is one more.


I found out about a week over that the baby shower we were planning for February needed to be done in a couple weeks. Yikes! There are so many easy, simple, and quick ways to decorate in a hurry. Votives are one of those great examples. They are SO easy to match up with themes. And inexpensive! Another bonus.

These little votives came from the Dollar Tree, 2 for a dollar! Woohoo! Matched up with some modge podge, .50 cent paint from Walmart, and some sponge brushes...a recipe for cuteness.


First I painted the votives, and as they dried I cut out the little circles in the paper shown here. This is also the paper being used in the baby shower sign! So it all matches, yay! The votives needed several coats, but eventually they were dry enough for me to modge podge the circles on them. After a lil bling is added they are cute as a button!


All in all this took about an hour, with dry time included.  Fun, easy, versatile, AND inexpensive.


Tuesday, November 22, 2011

A Texas Rangers Baseball Birthday

So this birthday was thrown for my 23-year-old husband, there's not very much cutsie ideas in here but you can always take this stuff and switch it around to your liking. 

I started this party like I do every party, on Google Imagine trying to find all the cool things I could print and make.  The total cost of this party, food and all, was under $50.  I'll start by showing you all the awesome, free, signs and printables I made.  First the big birthday sign...

This sign was made in power point by covering the whole page with a giant circle and filling in the middle with one letter at a time.  I cut those letters out, along with some Texas Ranger circles and tapped them to a blue plastic table cover.  I then stuck them on the back of our ping pong table turned dinner table.  It would look equally awesome just tacked up on a wall or you can string ribbon through each one and hang them without the background like I've done in several other blogs.
This picture here is the wall behind our couch which is unfortunately empty as we've yet to find any awesome art to go there.  It worked out pretty well for this party though :).

The hat and the two foam hands came from our own Texas Ranger collection but the rest I printed myself.  Here's a little bit of a break down...
This Texas sign was copy pasted from Google Image and then I cut it into four's using a cropping tool in a very basic picture manager.  I printed all four sections and tapped them together.  That way I had a much bigger sign!  The sign below I made by getting a picture of the Texas Ranger's circle and I took it into, you guessed it, power point.  I threw a circle over it to cover up the middle and put some letters and pictures there instead.  I glued these together and tapped them up on my wall. 

Now this picture down here is a picture of the drop downs I made.  I had the three red twirly thingys but they had cupcakes on them, so I took them off and replaced them with printed pictures of my hubby.  The best way to avoid cost at a party is to drag out everything you can reuse before purchasing anything.

This is the book shelf, because everything needed to be decorated, of course!

This below is one of two banners I created with the help of Google Image and Power Point.  I snagged this lone picture and printing a bunch of it, glued them together, and tapped them to our TV stand.

 I did the same thing with this banner, and if you see in the background some extra decoration that was done in a similar way as the first two signs.  I also brought out a bunch of pictures of him and the birthday scrap book I've made for him.

Now I wanted to have a special cake ordered for him but it was $100 and he said he wanted that money put towards gifts instead so I pocketed the cash and baked the cake.  I did my best to decorate, I'm not very good with artsy stuff, but it meant more to him this way.

       The cup cakes are lemon with cream cheese icing, they were to die for and the little picks on them I made in the same way I made the signs at the beginning of the blog, just in a smaller scale.  The letters and everything else white I just cut out of sugar paper.
So that's my Texas Rangers Bday party, I hope it inspired all those party planners out there on a budget!  As always if you've got any questions or need some advice feel free to ask.  Good luck and God bless!

Monday, November 21, 2011

Felt Flower Tutorial

This is my felt flower tutorial.  It's extremely easy to make these and they look great has hair bows or pins.  What you need; scissors , hot glue gun, sheets of felt, and different things for the centers of the flowers.  I've got pearls and rhinestones out but I only used the rhinestones.  What you don't see in this photo is the empty toilet paper roll that I used as my base.  I glue a small piece of felt to one side and the petals to the other so you have a sturdy center.

The first thing you're going to do is cut a two to three inch piece off the felt like this picture below.

Now fold it up into small pieces like this...
Then cut it into circles.  Next your going to glue one end of the circle and pinch it so it looks more like a petal.  This is what they should look like.
Next glue each on, I did five on each layer and it turned out pretty good.
Add some pretty stuff to the middle and your done.  This is how mine came out


Wednesday, November 2, 2011

Christmas Wreath Tutorial

This is my Christmas wreath tutorial! It's pretty simple and something everyone should consider before going out and spending a ton of money on decorations. If you own a glue gun you have the ability to make almost anything.
The materials you'll need, or at least the material I used, is a green pine wreath, garland, two things of plastic bulbs, and a centerpiece (like my Santa).

Tip # 1: Use plastic bulbs, the glass weigh more and can cause some issues in the long run.
The reason I bought extra garland, even though my wreath started out green, was to ensure that the bulbs wouldn't take over and the green would show through. So for an extra dollar it's worth it. I wrapped the garland around it until the whole thing was evenly colored. At this point you should already have your glue gun plugged in and warming up.


The next step I took was to place my Santa, you want to do the centerpiece first so that you have a place to start from.


Then begin glueing on your bulbs. I suggest working out a pattern ahead of time so you don't have any wholes.


This was my finished piece. I threw on some last minute additions including the small red bow and the little golden jewels. This stuff came out of my Christmas stash from last year. I'm strongly considering trying to find a red Merry Christmas sign to go in the middle. Make it your own, leave it plain, either way this Dollar Tree Christmas Wreath only cost me a grand total of $6!

I hope everyone has an awesome Christmas this year, stay tuned for MUCH more decorating ideas. Good luck and God bless!


Tuesday, November 1, 2011

Personalized Cake Stands

Personalized Cake Stands! Oh YEAH! This one was right up my party throwing ally. The first thing I did was go to the DT and pick up two clear plates and two clear vases. Next I took a picture of the napkins we had bought for the party (my daughters dedication) and printed it on two sheets of card stock. You're also going to need a hot glue gun. The pictures are pretty self explanatory so like always I'll let them do most of the talking.
I cut the card stock down to were it would fit inside the vase and hot glued it in a circle so it would stay in there tightly.I had space left in each page to trace a circle out and put it on top of the vase. I strongly suggest this other wise if your treats get eaten as fast as mine do people will see that you have paper in that vase! We can't have that now can we?Hot glue the plate to the vase and you're done. Here's what they are going to look like when you're finished. I didn't actually put cake on top of mine because I baked a cake in the shape of a cross. Instead I covered mine with fruits and veggies.


So that's my personalized cake stand, total cost? $4! As always if you've got any questions or want some advice for your party just ask :). Good luck and God bless!

Wednesday, October 19, 2011

Hot Pink Zebra Print 1st Birthday


This is my daughters first birthday all zebra'd out. I'm going to basically let the pictures tell the tale with a few explanations and tips inbetween.

These pictures are the before pictures of the venue we rented. It was a beautiful pavilion with a playground next to it, lots of shade and a cool breeze.


The first thing I got to work on when I got there was the tables. Make sure you account of the wind, I didn't and the very light breeze nixed several of my table decorations due to their lightness.

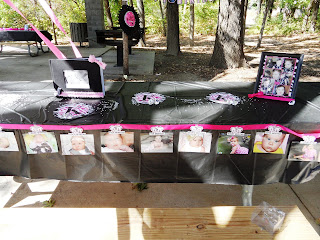
I searched around my house for all the pictures of our princess that were already framed and added some removable decorations. I paired them with some acrylic diamond confetti and dotted the table with some larger diamonds. Every so often the sun would shine between the trees and catch them.


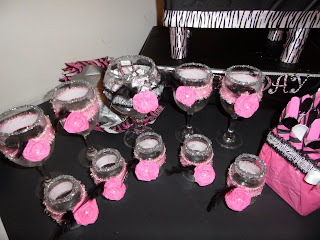
Tip #1 Glue the ribbon to itself not the frame that way it slips right off and can be reused!The jars you see on the tables were completely free! The small jars are baby food jars that I wrapped with ribbon and adorned with a crepe paper flower and glitter. The larger jars are jalapenoe jars and the wine glasses came from my glass cabinet. I filled them with water pearls that sparkles beautifully when the sun shined on them.


This idea came to me last minute via Google Image. The pictures start with her at birth and follow her through the last twelve months. This table is the table to hold the gifts, the other half I left undecorated to make room. The glittery letter K's on the tabel were printed on regular paper and circled in glitter. I used the larger diamonds to hold them down and added a couple more photo's.


Tip #2: If you are planning on keeping your acrylic diamonds, as I was, then pick them up first. The lightest breeze sent those plastic table covers up and my diamonds went with them.


Now on to the food!


This is the canopy I made for the cake. I grabbed a round flower plant holder thingy from HL and through a ton of zebra ribbon, finishing it with some feathers. The cake came from Tango Bakery and was only $60! I bought the crown on top at the DT and the feathers half off at HL. Here is the cupcake stand I made DIY. They are shoe boxes wrapped in one of the black plastic table clothes. They're being held up by ribbon wrapped toilet paper rolls. I printed the letters for the sign myself on regular paper, cut them out, added some acrylic diamonds for sparkle and done. I baked the cupcakes myself and tossed some cute little pearlized sprinkles on top.


Here's the full table of food. The trays and bowls, which I accented with some zebra ribbon, all came from the DT. I chopped the top of a pinapple for a centerpiece on the fruit tray. There's cheese, meat, cucumbers, celery, tomatoes, onions, carats, several types of fruit and off to the side a tone of cookies and other treats. The grand total of the food for this party, thanks to my savy shopping, was $50!
Below is the drink area, I freeze my punch in advance so everyone can get an ice cold drink. The cups came from Party City and I printed the sign myself. It's all accented with diamonds of course, and if you've noticed my small table runners they came in a large chunk of fabric from WalMart. I cut them up and threw them on the table.


Tip #3: The condensation and sweets attracted some extra friends, bees! Totally unexpected. I'm not sure what could have been done about them, but just an FYI if you're having an outdoor party.


Here's the front of the line, the silverwear, that I wrapped in the napkins, are sitting in small boxes. I made those boxes out of tissue paper and popsickle sticks! I glued some pearls and diamonds on some matching ribbon to make them extra fab!

Now for the Candy Bar! Below is a picture of it complete, it came out awesome! Most of the jars came from the DT, I decorated them with crepe paper flowers, feathers, ribbon, diamonds, and pearls. The little scoops for them came from HL as did the cute little boxes. The box they're standing on was made from a shoe box like the cupcake stand and once again I printed the little banners you see.


These are some of the jars I used before I decorated them.

Here's how I did some of the personalization for free. I started by finding the deminsions for chocolate nuggets online and used them to create my own template in power point.

After that I cut 'em up and used a glue stick to keep them together.


Here they are their jar. This is actually a small fish bowl hot glued to a glass candle stick holder.


Next I personalized some kisses using the same technic. Adapt and overcome ya'll!


Below are some extra pics of some of the decorations I used. This one here is the first bit of stuff I bought before it occured to me that I could make that same sign for next to night. I already had it though and it went fantastic in the trees.These two signs I did actually make myself. A bit of tape held them up through the whole party.This is a picture of the crepe paper I used to basically toilet paper this area. I wanted to create a wall effect but the wind was blowing slightly and instead it looked more airy. Still awesome though.
So that's it. Another party down, so many left to go. I hope ya'll enjoyed it and I hope it helps. As always if you need any advice just message me. Good luck and God bless!